Bringing 10,000 visitors to your blog daily is no small feat. It’s a difficult task that only a few large sites can accomplish.
However, with the right tools, you can make it happen. A traffic generator is one such tool that can help you increase traffic to your blog.
In this blog, we’ll be discussing the benefits of using a traffic generator and the features of one such tool – WHB-TrafficBot_2.
Why Use a Traffic Generator?
The success of a blog depends heavily on the number of visitors it receives. The more visitors you have, the more opportunities you have to convert them into customers, subscribers, or followers.
Traffic generators help you increase the number of visitors to your blog. With a traffic generator, you can get as many visitors as you want, which will in turn boost your site’s rank.
WHB-Traffic Bot 2
Why use WHB-TrafficBot_2 ?
WHB-TrafficBot_2 is a powerful traffic generator that can generate unlimited traffic to your website, blog, video, and any other page.
This software allows you to set the traffic source, meaning you can generate traffic from search engines, shopping sites, or even your own website ads.
Additionally, you can use it to click on your competitors’ Google ads, which will cost them money.
One of the key features of this tool is its ability to simulate human behavior.
The software uses anti-fingerprint technology and anti-tracking technology to bind proxies, making every visit appear as if it’s being made by a real person.
This makes the traffic generated by the tool appear genuine, which is crucial in improving your site’s ranking.
Setting up WHB-TrafficBot_2To Increase Website Traffic
Using WHB-TrafficBot_2 is easy and straightforward. First, you need to purchase the software and install it on your computer. Once you’ve done that, you need to set up your task.
You can set how many search, click, or view you want in a certain time, as well as the ratio of search, click, and view. You’ll also need to bind proxies to your task, which will make every visit appear as if it’s being made by a real person.
Next, you need to select the traffic source. You can generate traffic from a search engine or shopping site, or you can use it to auto-click your own website ads.
The software will then start generating traffic to your blog, which will appear genuine and organic.
Conclusion
Getting 10,000 visitors to your blog daily is no small feat, but with the right tools, it’s achievable. WHB-TrafficBot_2 is a powerful traffic generator that can help you increase the number of visitors to your blog.
Its ability to simulate human behavior, anti-fingerprint technology, anti-tracking technology, and bind proxies make it an excellent tool for boosting your site’s ranking.
With its easy-to-use interface and straightforward setup process, WHB-TrafficBot_2 is an excellent tool for anyone looking to increase traffic to their blog.
If you’re looking for a powerful, user-friendly HubSpot CMS (Content Management System) for your business, look no further than HubSpot. With its all-in-one platform, HubSpot CMS offers a range of features and tools to help you create and manage your website, blog, and online marketing campaigns.
In this blog post, we’ll take a closer look at why HubSpot is the best choice for your business.
HubSpot CMS (Content Management System) is a powerful platform that allows businesses to create, manage, and optimize their website, blog, and online marketing campaigns all in one place. It’s an all-in-one solution that helps businesses to attract, engage, and delight their customers.
The HubSpot CMS Hub is a part of the HubSpot Marketing Hub, which is a set of tools and features designed to help businesses attract, engage, and delight customers.
It includes a range of features such as website design and development, blog management, SEO optimization, lead generation, and marketing automation.
With the HubSpot CMS Hub, businesses can easily create, manage, and optimize their website, blog, and online marketing campaigns all from one place.
From Website Design to Marketing Automation
Website design and development: With the drag-and-drop website builder, businesses can easily create professional-looking websites without any technical expertise.
Blog management: HubSpot makes it easy to create, manage, and optimize blog content for SEO.
SEO optimization: HubSpot includes a range of built-in SEO tools to help businesses optimize their website and content for search engines.
Lead generation: HubSpot offers a range of lead generation tools such as forms, calls-to-action, and landing pages to help businesses convert website visitors into leads.
Marketing automation: HubSpot allows businesses to automate and streamline their marketing processes, and track their progress in real-time.
Sign up for a HubSpot account: To get started with the HubSpot CMS Hub, you’ll need to sign up for a HubSpot account. You can choose from a range of pricing plans, depending on your business’s needs.
Create your website: Once you’ve signed up for an account, you can use the drag-and-drop website builder to create your website. You can choose from a range of customizable templates, or create your own design from scratch.
Add and manage your content: The HubSpot CMS Hub allows you to easily add and manage your website’s content, including pages, blog posts, and landing pages. You can also use the built-in SEO tools to optimize your content for search engines.
Generate leads: The HubSpot CMS Hub includes a range of lead generation tools, such as forms, calls-to-action, and landing pages, to help you convert website visitors into leads.
Automate your marketing: The HubSpot CMS Hub includes a range of marketing automation tools to help you automate and streamline your marketing processes, such as email marketing, social media, and more.
Analyze and Improve: Use the built-in analytics and reporting tools to track the performance of your website and marketing campaigns, and make data-driven decisions to improve them over time.
Overall, the HubSpot CMS Hub is designed to be user-friendly and intuitive, so you should be able to get started with it relatively quickly. The platform also offers a range of support resources, including tutorials, guides, and a knowledge base, to help you make the most of its features.
Conclusion
In conclusion, the HubSpot CMS Hub is a powerful and user-friendly platform that offers a range of features and tools to help businesses create, manage, and optimize their website, blog, and online marketing campaigns all in one place.
With its all-in-one solution, businesses can easily create professional-looking websites, manage and optimize blog content for SEO, generate leads, and automate and streamline their marketing processes.
The built-in SEO tools, lead generation tools, and integrations make it easy for businesses to attract, engage, and delight their customers.
The platform’s drag-and-drop website builder,easy-to-use blog and landing page templates, and real-time progress tracking make it easy for non-technical users to manage their own website and online marketing campaigns.
All of these features make HubSpot CMS Hub a great choice for businesses of all sizes looking for a comprehensive solution to manage their online presence and customer engagement.
There are a few ways to potentially obtain a visa for the Netherlands based on your cricket skills. One option would be to apply for a sports visa. This type of visa is specifically designed for athletes, coaches, and other sports-related professionals who need to travel to the Netherlands for training, competitions, or other events.
To apply for a sports visa, you will need to provide evidence of your cricket skills and achievements, such as a letter of recommendation from a coach or team official, as well as proof of your participation in cricket competitions or events. You also need to prove that you have enough money to support yourself during your stay and have a valid return ticket.
Another option would be to apply for a self-employed worker visa. This type of visa is for individuals who plan to work for themselves in the Netherlands, and it may be possible to use your cricket skills as the basis for your self-employed business.
Obtaining a Schengen Sports Visa in the Netherlands for Cricket Academy Admissions
It’s possible to obtain a visa in the Netherlands based on your admission to a cricket academy, but it would likely be under the category of a student visa or a sports visa.
In order to obtain a student visa, you would need to be accepted into a full-time cricket program at a recognized institution in the Netherlands.
The institution would need to provide you with an acceptance letter and a letter of sponsorship, and you would also need to provide proof of sufficient financial means to support yourself during your stay, and proof of health insurance.
For a sports visa, you would need to be participating in a professional or semi-professional cricket league in the Netherlands. The league or club would need to provide you with an invitation letter, and you would need to provide proof of your professional status as a cricket player, such as a contract or letter of recommendation from a coach or team official.
It’s always best to check with the Dutch embassy or consulate in your home country for the most up-to-date information and guidance on how to apply for a student or sports visa to study or play cricket in the Netherlands.
The official website of the Dutch government’s immigration and naturalization service (IND) provides information on the different types of visas available, including sports visas: https://ind.nl/en/Pages/Home.aspx
The Netherlands Board of Tourism & Conventions provides information on the Netherlands, including information on living and working in the Netherlands: https://www.holland.com/global/tourism.htm
The Netherlands Cricket Board is the governing body of cricket in Netherlands, you can check with them regarding the Cricket opportunities in Netherlands and any potential ways to get a visa as a cricket player. http://www.kncb.nl/
Schengen Visa For Cultural / Sports / Religious Event And Film Crews
A Schengen visa is a type of visa that allows individuals to enter, transit through, or stay in the Schengen area for up to 90 days within a 180-day period. The Schengen area includes 26 European countries, including the Netherlands. The visa can be issued for various reasons such as tourism, business, visiting friends or family, or for specific purposes such as cultural, sports, religious events, and film crews.
For cultural, sports, or religious events, a Schengen visa can be issued to individuals who are invited to participate in or attend such events in the Netherlands or other Schengen countries. To apply for this type of visa, you will need to provide an invitation letter from the organizer of the event, as well as evidence of your participation in the event, such as a letter of recommendation from a coach or team official, or proof of your involvement in the event as a performer or participant.
For film crews, a Schengen visa can be issued to individuals who are traveling to the Netherlands or other Schengen countries to work on a film production. To apply for this type of visa, you will need to provide a letter of invitation from the production company, as well as evidence of your role in the production and proof of the production’s financial backing.
It’s important to note that the specific requirements and documents needed to apply for a Schengen visa can vary depending on the type of visa and the purpose of your trip. It’s always best to check with the Dutch embassy or consulate in your home country for the most up-to-date information and guidance on how to apply for a Schengen visa for cultural, sports, religious events, or film crews.
The official website of the Dutch government’s immigration and naturalization service (IND) provides information on the different types of visas available, including cultural and sports visas: https://ind.nl/en/Pages/Home.aspx
The Netherlands Board of Tourism & Conventions provides information on the Netherlands, including information on living and working in the Netherlands: https://www.holland.com/global/tourism.htm
The Netherlands Film Fund website provides information on the Dutch film industry and the support available for film production in the Netherlands, including information on obtaining a visa for film crews: https://www.filmfund.nl/
It’s worth noting that these links may not have the specific information you are looking for, and it’s always best to check with the Dutch embassy or consulate in your home country for the most accurate and up-to-date information on obtaining a visa based on your cricket skills.
However, getting a visa based on cricket skills can be hard, due to the fact that Cricket is not as popular as other sports in the Netherlands, you may have to prove that you have a specific plan or project that will bring significant benefits to the Netherlands and also be able to support yourself financially during your stay.
It’s important to note that immigration laws and requirements can change over time and can vary depending on your specific circumstances, so it’s always best to check with the Dutch embassy or consulate in your home country for the most up-to-date information and guidance on how to apply for a visa based on your cricket skills.
Kanban was originally developed by Taiichi Ohno for the manufacturing industry, but it has since been adapted for use in software development, marketing, and other fields.
Kanban boards were originally used to visualize the flow of materials in a factory, but today, they are used to visualize the flow of work in a variety of settings.
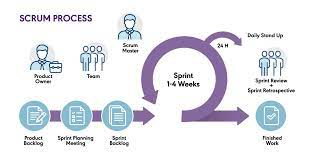
Scrum was first developed by Jeff Sutherland in the 1990s and is based on the principles of transparency, inspection, and adaptation
Scrum framework is heavily used in software development, but it is also used in other fields like product development, manufacturing, and marketing.
According to the “State of Agile” report, Scrum is the most popular Agile methodology, followed by Kanban.
Scrum team have a clear end goal and a set of deliverables that need to be completed within a specific time-frame, while Kanban focuses on managing the flow of work and implementing changes as they happen.
Introduction
Kanban and Scrum are two popular methodologies for project management, and both have their own advantages and disadvantages. In this blog post, we will explore the differences between Kanban and Scrum and help you decide which methodology is best for your team.
Project management is a vital aspect of any business, and choosing the right methodology is crucial for success. Kanban and Scrum are two of the most popular methodologies, and both have their own set of advantages and disadvantages. In this blog post, we will explore the differences between Kanban and Scrum, and help you decide which methodology is best for your team.
What is Kanban?
Kanban is a visual system for managing and optimizing workflow. It is a pull-based system, which means that tasks are only started when there is capacity to complete them. Kanban boards are used to visualize the workflow, with tasks represented by cards, and columns representing different stages of the process. Kanban is best suited for teams that have a high level of variability in their workloads.
What is Scrum?
Scrum is an Agile framework for managing projects. It is based on the principles of transparency, inspection, and adaptation. Scrum teams are self-organizing and cross-functional, with a focus on delivering working software in short sprints. Scrum is best suited for teams that have a well-defined and stable workload.
Scrum Methodology
Kanban vs Scrum
Kanban and Scrum are both effective methodologies for project management, but they have different strengths and weaknesses. Kanban is better suited for teams that have a high level of variability in their workloads, while Scrum is better suited for teams that have a well-defined and stable workload.
Kanban allows teams to easily adjust their workflow and priorities as the project progresses, making it easy to manage projects with changing requirements and priorities. Scrum, on the other hand, focuses on delivering working software in short sprints, making it a great option for teams that need
10 Key Differences between Kanban and Scrum Methodology“
Differences between Kanban and Scrum Methodology
Kanban is a pull-based system, while Scrum is a push-based system.
Kanban does not have time-boxed iterations (Sprints) like Scrum does.
Kanban teams do not have predefined roles, while Scrum teams have roles such as Scrum Master and Product Owner.
Kanban teams focus on managing the flow of work and implementing changes as they happen, while Scrum teams focus on delivering working software in short sprints.
Kanban allows teams to easily adjust their workflow and priorities as the project progresses, while Scrum has a fixed set of deliverables that need to be completed within a specific time-frame.
Kanban is best suited for teams that have a high level of variability in their workloads, while Scrum is best suited for teams that have a well-defined and stable workload.
Kanban boards are used to visualize the workflow, with tasks represented by cards, and columns representing different stages of the process, Scrum uses burndown charts, sprint backlogs, and sprint planning meetings.
Kanban does not have a concept of “Done” like Scrum does.
Kanban does not have the concept of Retrospectives like Scrum does.
Kanban does not have a fixed length of iterations like Scrum does, so it’s a more flexible and less prescriptive approach to project management.
Conclusion
In conclusion, Kanban and Scrum are both powerful methodologies for project management, but they have different strengths and weaknesses.
Kanban is best suited for teams that have a high level of variability in their workloads, while Scrum is best suited for teams that have a well-defined and stable workload.
Both methodologies have their own set of advantages and disadvantages, and it’s essential to understand your team’s specific needs and work environment to decide which methodology is the best fit.
As both methodologies are designed to improve the way teams work, it is important to continuously inspect and adapt the chosen methodology to ensure it remains effective.
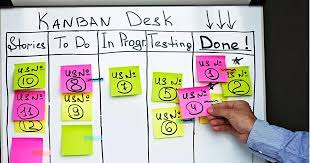
Kanban boards are an essential tool for project management, and they are becoming increasingly popular among teams looking to increase efficiency and productivity. In this blog post, we’ll explore what Kanban boards are, how they work, and why they are an excellent option for managing projects.
What is Kanban Board?
A Kanban board is a visual tool that helps teams manage their workflow. It is a simple and flexible way to organize and prioritize tasks, allowing teams to see the progress of their projects in real-time.
The board is divided into columns, each representing a different stage of the project, such as “To Do,” “In Progress,” and “Done.” Each column can hold cards, or tasks, that represent a specific piece of work.
Benefits of using Kanban Boards
One of the main benefits of using a Kanban board is its flexibility. It allows teams to easily adjust their workflow and priorities as the project progresses.
For example, if a new task is added, it can be quickly added to the “To Do” column, and moved through the board as it is completed. This makes it easy to manage projects with changing requirements and priorities.
Another benefit of Kanban boards is that they provide a clear visual representation of progress. Team members can quickly see what tasks are currently being worked on, what is coming up next and what has been completed. This helps to keep everyone on the same page and ensures that no tasks are missed.
Kanban Board
How to use Kanban Boards
To start using a Kanban board, you need to create a board and add columns for each stage of your project. You can then add cards, or tasks, to the “To Do” column. As the tasks are completed, they are moved to the next column, until they reach the “Done” column. You can also add labels, comments, and attachments to the cards, to provide more information about the task.
You can also add swim lanes to your Kanban board, which can be used to group tasks by category or priority. This makes it easy to see which tasks are the most important, and which ones need to be completed first.
Why use Kanban Boards
Kanban boards are an excellent option for managing projects because they provide an easy way to keep track of progress and make adjustments as needed. They are also flexible, allowing teams to adapt to changing.
Conclusion
In conclusion, Kanban boards are a powerful tool for project management. They are simple, flexible, and provide a clear visual representation of progress. They allow teams to easily adjust their workflow and priorities, making them an excellent option for managing projects with changing requirements.
With the help of Kanban boards, teams can ensure that no tasks are missed and improve their overall efficiency and productivity. If you are looking for a way to improve your project management, consider using Kanban boards as they provide a clear, flexible, and visual approach to managing projects.
“Jira: The Ultimate Solution for Agile Project Management and Collaboration” is a title that screams “you need this in your life!” and trust me, your team will thank you for it. Jira is like a superhero for Agile teams, it comes with a cape of features such as sprint planning, kanban boards, and issue tracking that makes it a no-brainer for teams looking to implement Agile methodologies.
Jira is a powerful tool that is widely used for Agile software development. It offers a range of features that make it a popular choice among teams looking to manage their tasks and projects in an efficient and effective manner. In this blog post, we’ll take a closer look at Jira and explore its key features and benefits.
One of the key benefits of using Jira is its ability to improve collaboration among team members. It’s like a virtual team hug, with Jira, team members can easily communicate and share information, which can lead to better coordination and faster problem-solving. Additionally, Jira’s issue tracking and reporting capabilities can enhance transparency, making it easier for teams to identify and address problems as they arise. No more “who broke the build?” moments.
One of the main features of Jira is its ability to support sprint planning. This allows teams to organize and prioritize their tasks in a way that aligns with their Agile development process. Jira also provides a kanban board, which gives teams a visual representation of the workflow and progress of their tasks.
Another key feature of Jira is its issue tracking capabilities. Jira makes it easy for teams to track and manage bugs, new feature requests, and other issues that arise during the software development process.
Customization and Integrations
Keywords: Plugins, integrations, customization
Jira is highly customizable, with a wide range of plugins and integrations available to suit the needs of different teams. This allows teams to tailor Jira to their specific workflow and process. For example, teams can integrate Jira with other tools such as Slack or GitHub to streamline their workflow and improve collaboration.
Using Jira can bring a number of benefits to your team’s workflow. By providing a centralized location for task management and tracking, Jira can help teams to improve their efficiency and productivity.
The tool also promotes better collaboration by making it easy for team members to communicate and share information. Additionally, Jira’s issue tracking and reporting capabilities can enhance transparency and make it easier for teams to identify and address any problems that arise.
Another benefit of Jira is its flexibility and customization. It’s like a chameleon, Jira offers a wide range of plugins and integrations that can be used to tailor the tool to the specific needs of different teams. This can allow teams to streamline their workflow and achieve better results.
In conclusion, Jira is a powerful tool that can help teams to manage their tasks and projects in an efficient and effective manner. Its features, such as sprint planning and kanban board, make it a popular choice for Agile software development, and its wide range of plugins and integrations make it highly customizable. If you’re looking for a tool to help manage your team’s workflow, Jira is definitely worth considering.
It’s worth noting that the information mentioned above is a general representation of Jira capabilities and features. Please refer to the official website for more detailed and accurate information.
Do you know how much is the Google Ads pricing these days? It’s a reasonable question, and one we hear all the time, especially from newcomers to paid search. After all, you’ll want to know whether you can afford it. The good news is, you can and here is a detailed explanation of google ads pricing.
What is the Google AdWords Auction?
Google Ads auction determines your Google ad placement and the cost you are willing to pay for your selected keywords.
Inside the Google Ads auction, advertisers ad ranks determine the placement of their ads and the Google Ads cost per click they will have to pay.
The ad rank of your advertisement is based on your ad quality and maximum current bid for that keyword. Of course, your competitors bids are outside of your control, however you can work on your ad quality.
By keeping an exemplary ad quality score, you can spend less on Google Ads cost yet still get a higher ad position. You can also take advantage of tools such as callout extensions that can add to the appeal of your ads once they are posted.
How Much Should You Spend On Google Ads?
In 2022, the average Google AdWords cost per click is about $1 to $2 on the Google Search network. Some newer niches may still see lower costs, while more established businesses, might see higher cost-per-click averages.
As a rule, your cost-per-click is contingent on factors such as your type of industry, current trends and your product or service costs. Google Ads pricing is extremely subjective, depending on the expected revenue you will generate from a newer customer.
For example, businesses in the real estate, legal or accounting industries may gain $1000 to $10000 per new client, so spending $40 per click on a Google Ad is well worth the investment. For industries where the profit margin is lower per customer, it might not be worth spending more than $1-$2 per advertisement.
Google ads pricing page
In highly competitive industries that generate more revenue per client, companies are typically willing to spend $10 per click on average. It is important to understand the relative value between your per-customer-revenue and how much you can spend on your Google Ads campaign.
If you are just starting to run Google Ads campaign, it is a good idea to begin conservatively. The best way to ensure you don’t overspend on Google Ads is with a low daily budget.
Once you get some data to see the results of your ad campaigns, you can later increase this when you start to see a better return on investment (ROI).
This is a huge benefit of online advertising. With conventional print ads, you cannot test as effectively. But with online pay-per-click ads, you can keep tweaking and adjusting as much as you like, and seeing what gives you the best return on investment.
Before you consider spending any money on Google advertising, its important that you first:
Create attention-grabbing, high-quality ad copy
Do keyword research based on what your customers and prospects are clicking on in your industry
Work on your landing pages for your products and service offerings, so that they convert well once a person clicks
Observe what it working for your competitors in your space, and find ways to create similar or more compelling offers
What Is The Ideal Budget For Google AdWords?
The vast majority of Google’s revenue is based on the success of Google Ads. For this reason, they have a lot of tools to help businesses who want to advertise on their platform.
To help you decide on your budget and Google Ad Words cost, you can use the Ads Cost Calculator. Google AdWords offers a budget control features that allow you to adjust your cost of Google Ads each day.
Budget For Google AdWords
View your cost and payment history
Your Google Ads account’s billing “Transaction history” page provides easy access to your billing information. View current charges, payment details, and much more. Learn more about how to access your billing information
View Costs from Reports
While your Transactions page shows you monthly accrued costs for each campaign, you can view daily costs for one or more of your campaigns – or even your entire account – by viewing your Billed cost report.
With this report, you can also check your served cost versus your billed cost for each campaign. The served cost is the cost of all the clicks or impressions that the campaign received.
The billed cost is the actual amount you’re responsible for paying, after adjustments have been made to your account for items like overdelivery, invalid activity, and more.
Once you know the typical return you will earn from a new customer purchasing from you, the Google Ads Cost Calculator can generate how much your return on ad spend (ROAS) would be. This calculation can help you determine if the cost of a particular Google ad is too expensive.
With this tool, you can assess whether increasing your ad spend by a certain percentage will generate more money or incur losses.
Another great benefit of the Google Ads Cost Calculator is that it can also deliver estimates of relevant data, such as the number of sales per month, gross revenue per month, gross profit per month and your return on advertising investment.
Conclusion
As we’ve stated throughout, there are numerous factors that can have a significant impact on the cost of running a PPC campaign, but remember: almost any type of business can make Google Ads work for them!
Google Ads Campaign is one of the two largest ad channels. It’s also one of the most consistently profitable channels for growth and high performance of business. If used in appropriate way it can do wonders to your business.
We mainly use google ads campaign because:
Google ads generate an 8:1 ROI: Every $1 spent on Google ads campaign generates $8 in profits. And according to Google, that’s being conservative.
Ads drive results quickly: Pay per click (google PPC) ads generate 2x more visitors than SEO, which means you can grow your business faster.
There are many different goals, campaign types, and ad formats within the Google ads platform. If you’re new to the ecosystem and trying to figure out the best ad strategy for your business, it might not be so obvious how all these pieces fit together. So to make you familiar with google ads campaign here we have elaborately explained its types
Google offers a variety of different campaign types that you can use:
Search campaign
Display campaign
Shopping campaign
Video campaign
App campaign
Let’s take a look at each campaign type now to see how they work—and which you should choose.
Search Campaign
Consumers generally use search engines—unlike social media—with a specific intent in mind: to search for answers, get solutions to their problems, or find specific products or services. This makes Google a powerful marketing channel for a variety of businesses.
You can inform how you advertise on Google based on the average volume of monthly searches for a given query, the estimated cost you would pay per click, and other data Google makes readily available. You can run search ads that promote your products and services directly in the search results of a specific query and even narrow your targeting to users in a certain geographical area.
Say you’re selling Smartphones. More than 200,000 people search for “Smartphones” on Google every month, but there are far fewer searches for “Budget smartphones.” Google will let you bid (more on this below) to advertise your brand on both of these phrases individually, but the more specific search term likely will convert better because it’s more relevant to your product.
You can create text ads, which display in search results marked with the word “Ad” in a small box, or Google Shopping ads, which surface key purchasing information, such as product photos, prices, and ratings—something that makes them perfect for many ecommerce brands. You can see both text and Shopping ads in action below.
Shopping Campaign
Google Shopping campaign are vital to any business selling products. They are the visual ads you see on the Search and Shopping tabs on Google.
This type of Google Ads campaign survives off a product feed you provide—which lives within Google Merchant Center. Shopping feeds hold all your product information, called attributes, about your products like price, color, quantity, and more.
Google creates your Shopping ads and chooses when to serve them on the SERP based on the details provided in your feed. Because of this, the structure of your Google Shopping campaign will be different from other campaign types. Instead of “ad groups” you’ll have “product groups” to separate out categories of products.
To narrow your targeting since your product feed subs in for your keywords, you’ll rely on negative keywords and other targeting parameters, like location settings and more
Google Shopping campaign
If you have a physical product, Google Shopping campaign can get qualified leads by showcasing your product directly to customers.
Display Campaign
The Display Network leverages Google’s vast website partners to showcase your ad on different websites all over the Internet.
And there are a variety of different ways they appear. First, your ad can appear on on third-party websites like so:
Google display campaign
You can also have a video ad appear as a pre-roll before YouTube videos:
Google also allows you to advertise your ad on its email platform Gmail
Some benefits of using the Display Network is its reach. Google partners with more than two million websites and reaches more than 90% of all Internet users to help ensure your ad gets in front of the most eyes as possible.
The ads themselves are also flexible in terms of style. Your ad can be a gif, text, a video, or image.
However, they don’t come without their downsides. Your ads might end up appearing on websites you don’t want them to or in front of videos that you don’t want your brand associated with. This hasn’t been more evident than with YouTube’s various “Adpocalypses” throughout the past few years.
If you’re careful about where you’re putting your ads, though, the Display Network can be a great place to garner leads.
Video Campaign
These are ads that appear in the front of YouTube videos in the form of pre-rolls.
“Wait didn’t we just cover this with the Display Network?”
We did! But Google offers the option of choosing video ads specifically, rather than more broadly advertise on the Display Network.
This is perfect if you have a great video ad idea you want to test out.
Video ad campaign
The video campaign ads come in a variety of different forms. There are skippable video ads like the one above. There are unskippable ads also.
There are discovery ads which you can find on the search results page of specific keywords and there are the various overlays and banners.
App Campaign
Like video ads, app ads are also included in the Display Network but can be used for targeted campaigns.
For this, you don’t design each individual app ad. Instead, they’ll take your text and assets such as photos and they’ll furnish the ad for you.
App Campaign
The algorithm tests different asset combinations and uses the one that performs the best more often.
Conclusion
Now that you know the types of ads you can create with Google, let’s take a look at cost.
There is no right or wrong answer when it comes to which campaign is best for your unique needs. Everyone’s Google Ads/Local Services Ads campaign mix will look different. Clearly, if you don’t what type of Google Ads campaign is best for you, you certainly have plenty to try out.
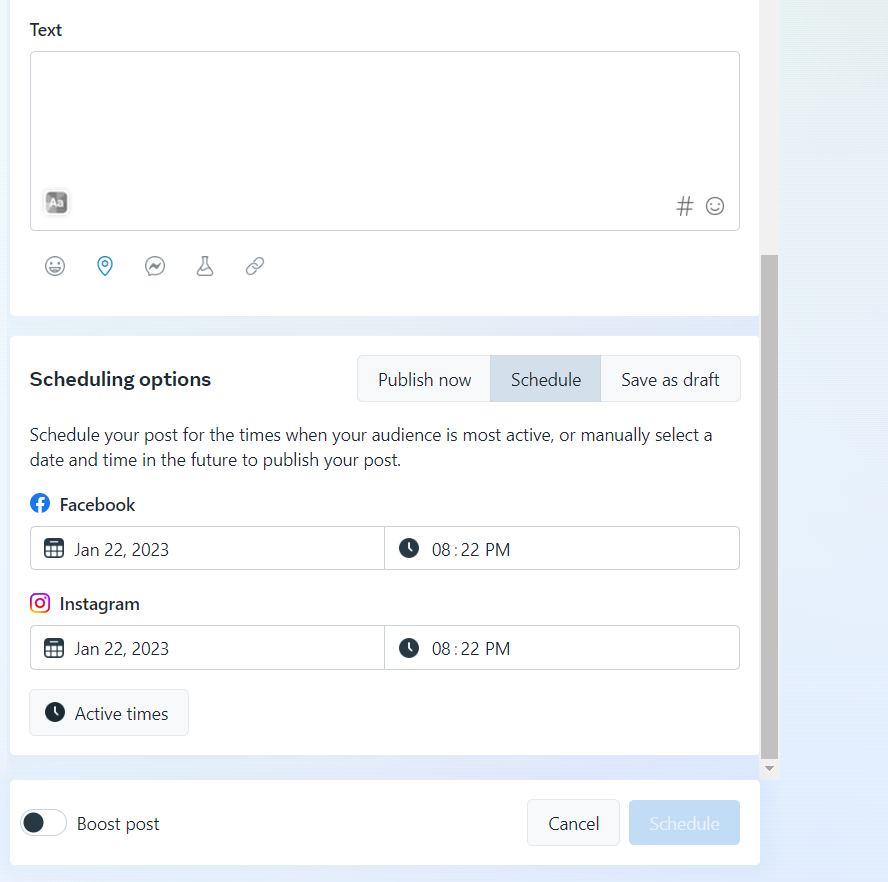
Instagram as a social media platform allows you to share photos and videos, connect with others, and explore a wide range of content. It is designed for visual storytelling and building a community of like-minded people.
With over 1 billion monthly active users, it is a powerful tool for reaching a large audience and building brand awareness.
One of the key features of Instagram is its visual appeal. The platform is optimized for images and videos, which makes it an ideal platform for showcasing products and services in a visually appealing way. This makes it a great tool for businesses looking to generate leads and sales.
Additionally, Instagram’s “Explore” page allows users to discover new content and accounts that align with their interests, which can help increase the visibility of your content to a wider audience.
Instagram also has a robust set of tools for networking and connecting with others. Users can interact with each other through comments, direct messages, and hashtags, making it easy to connect with like-minded individuals and build a community.
For businesses, it can be a great way to connect with customers and other industry professionals.
Another advantage of Instagram is the built-in analytics and insights feature known as Instagram Insights. It provides valuable data such as demographics, interests, behaviors, and more, which can help businesses understand their audience better and improve their marketing strategies.
Overall, Instagram is a versatile platform that offers many benefits for personal and business use.
Why to Schedule Posts on Instagram
There are several reasons why someone might want to schedule posts on Instagram:
Create a Post on Instagram
Measuring performance: Scheduling posts in advance can help you track the performance of your posts, and adjust your strategy accordingly.
Consistency: Scheduling posts in advance can help you maintain a consistent posting schedule, which can help keep your followers engaged and increase the chances of your posts being seen.
Time management: Scheduling posts in advance can save you time and allow you to focus on other aspects of your business or personal life.
Time zone optimization: Scheduling posts in advance can help you reach a larger audience by ensuring your posts are live when your followers are most active.
Branding strategy: Scheduling posts in advance can help you plan a cohesive content strategy and aligns with your branding objective.
Overall, scheduling posts on Instagram can help you optimize your social media presence, increase your reach, and save you time and effort.
How To Schedule Post on Instagram
There are a few different ways to schedule posts on Instagram:
Use a third-party scheduling app, such as Hootsuite, Later, or Buffer. These apps allow you to create and schedule posts in advance, and then automatically post them to your Instagram account at the designated time.
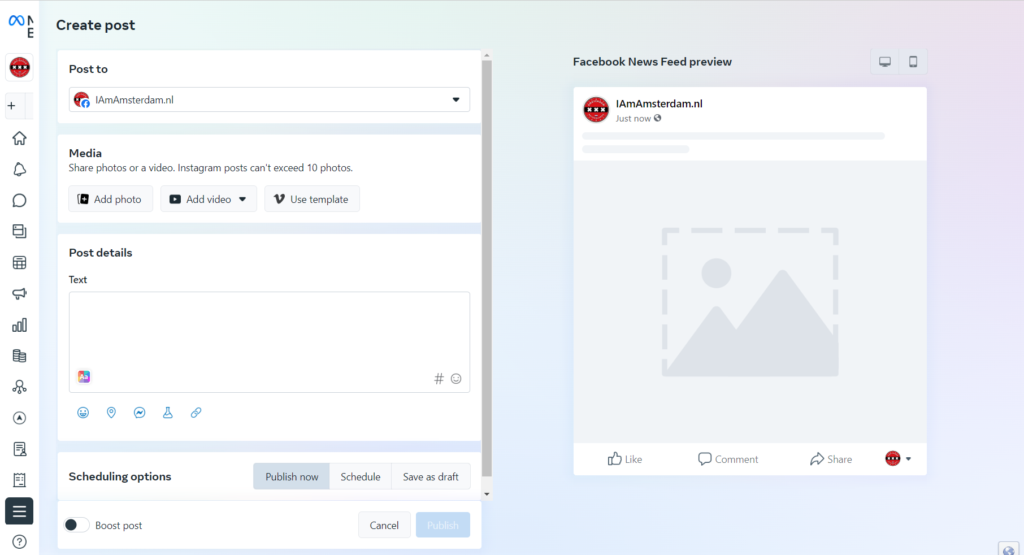
Use Instagram’s built-in scheduling feature, which is available to business accounts. To schedule a post, tap the three dots in the top-right corner of the screen when creating a new post, and then tap “Schedule”.
To schedule a post on Instagram using Meta Business Suit, you will need to follow these steps:
Connect Instagram account to Meta Business Suit AppCreate a Post from Meta Business Suite AppSchedule, Review and Publish your post
Connect your Instagram account to the app: You will need to log in to your Instagram account in the Meta Business Suit app and give it permission to access your account.
Create your post: In the Meta Business Suit app, create your post by adding text, images, and/or videos. You can also add hashtags, location tags, and mentions, just like you would in the Instagram app.
Schedule your post: Once your post is created, you can set a date and time for when you want the post to be published on Instagram.
Review and Publish: Before the scheduled time, you will get a reminder to review and publish the post. You can also edit, delete or publish the post on the spot.
Conclusion
In conclusion, scheduling posts on Instagram from a third-party app like a Meta Business Suit can be a great way to save time and maintain a consistent posting schedule. The process involves connecting your Instagram account to the app, creating your post, scheduling the post, and reviewing and publishing it before the scheduled time.
By using a third-party app, you can also track your post performance and make adjustments to your strategy accordingly. However, it’s important to note that Instagram’s API has certain limitations, and it’s important to read the terms and conditions and check if the app is authorized by Instagram before using it.
Dividing the work hours for your team of 8-10 people can be a challenging task, especially when you are working on multiple projects and using a 2-week sprints method. Here are a few suggestions that may help you to divide the work hours more efficiently.
A Guide To Project Management
Assign specific roles and responsibilities: Clearly define the roles and responsibilities of each team member, and make sure they understand what is expected of them. This will help them to focus on specific tasks and make better use of their time.
Prioritize tasks: Prioritize tasks based on their importance and urgency, and assign them to the most suitable team member. This will help ensure that the most important tasks are completed first, and that everyone is working on tasks that are best suited to their skills and experience.
Use time tracking tools: Use time tracking tools like Toggl, RescueTime, or Harvest to monitor how much time each team member is spending on different tasks. This will help you to identify any areas where time is being wasted, and make adjustments as needed.
Project Planning – Generated from ChatGPT
Encourage collaboration: Encourage your team members to collaborate and share ideas. This will help them to work more efficiently, and also promote a sense of teamwork and camaraderie.
Regularly Review: Review the work hours and progress of each team member regularly, and make adjustments as needed. This will help you to identify any issues or problems early on and make changes to ensure that your team is working as efficiently as possible.
Flexible hours: If possible, consider allowing team members to work flexible hours so that they can better manage their time and work when they are most productive.
It’s worth noting that these suggestions are general and may not apply to your specific situation. It’s always important to consider the specific context of your team and organization before making any changes.
Resource allocation ->Work Hours Vs Team Members
Here’s an example of a calculation table that could be used to divide the work hours for your team of 7 people:
Team Member
Role
Weekly Work Hours
Developer 1
Lead Developer
20 hours
Developer 2
Back-end Developer
20 hours
Developer 3
Front-end Developer
18 hours
Developer 4
Full-Stack Developer
18 hours
Developer 5
Quality Assurance
16 hours
Designer
Designer
20 hours
Product Owner
Product Owner
10 hours
Work Hours Vs Team Members
Total: 112 hours
You can adjust the number of hours based on the specific needs of your team and projects. You can also divide the work hours by days or by sprints, and you can even add more columns to the table such as the project name, sprint number, and any other relevant information.
Please note that this table is an example and the number of hours may vary based on the specifics of your organization and team. Additionally, you may want to consider having some buffer hours for unexpected work, meetings, and other tasks that may arise.
Project Planning Template
Project planning is crucial for the success of any project, as it allows you to set clear goals, identify potential issues, and take action to prevent them, it also facilitates communication, allows efficient use of resources, and helps to stay within budget, and ensures that the project is completed on time.
Step 1: Define the project
Identify the project’s objectives and goals
Determine the project’s scope and deliverables
Establish the project’s stakeholders and their roles and responsibilities
Define the project’s constraints, such as budget and resources
Step 2: Create a project plan
Develop a project schedule, including a list of tasks, dependencies, and milestones
Identify and allocate resources, including personnel, equipment, and materials
Establish a project budget and financial plan
Develop a project risk management plan
Define the project’s quality plan
Step 3: Execute the project
Implement the project plan
Monitor and control the project’s progress
Address any issues or problems that arise
Communicate regularly with stakeholders
Step 4: Close the project
Complete all project tasks and deliverables
Conduct a project review and evaluation
Document and share the project’s lessons learned
Close out any remaining project activities
This template is a general guide and may vary depending on the specifics of your project. It’s important to tailor it to your own needs and requirements. Additionally, it’s worth mentioning that for some projects, you may need more detailed planning, and in that case, you may consider using project management software such as Asana, Trello, Basecamp, and Jira, which can help you to manage and track the project’s progress.
Project Management Frameworks
There are several frameworks that can be used for project planning, and the right one for you will depend on the specific needs of your project. Here are a few popular frameworks:
WaterfallFramework
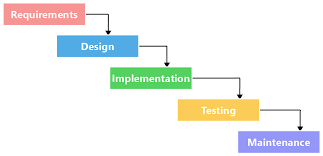
The Waterfall model is a linear, sequential approach to project management, in which each phase of the project must be completed before the next one can begin. This model is best used for projects that have well-defined requirements, and a clear end goal.
Waterfall Framework
AgileFramework The Agile framework is an iterative and adaptive approach to project management, in which the project is divided into small, manageable chunks called sprints. This model is best used for projects that are complex, or that have a high degree of uncertainty.
Agile Framework
Scrum Scrum is a specific type of Agile framework that is commonly used in software development, and it’s based on the Agile manifesto. It’s a framework that allows teams to work together to deliver a product incrementally through the use of Sprints.
Scrum Methodology
Kanban Kanban is a method that is used to visualize the flow of work, it’s based on the “pull” system, it’s used to manage the flow of work and it’s commonly used to improve the work efficiency in software development, manufacturing and other industries.
Kanban Board
Conclusion
In conclusion, Project management is a crucial process that helps organizations and teams to achieve specific goals and objectives. It involves planning, organizing, and managing resources to bring about the successful completion of a project. There are different frameworks and methods that can be used to plan and manage a project, such as Waterfall, Agile, Scrum, and Kanban.
Each of these frameworks has its own strengths and weaknesses, and the right one for you will depend on the specific needs of your project. Project planning is important as it helps to ensure that the project stays on track and meets its objectives, it helps to allocate resources effectively, it helps to manage costs, it helps to communicate effectively, and it helps to identify and manage risks.
Additionally, it’s important to have a clear understanding of the roles and responsibilities of the team members, and to use tools and methods to track progress, monitor performance, and make adjustments as needed.