Often, the greatest challenge marketers face when working isn’t the actual work. Instead, the other related tasks — brainstorming, scheduling, and coordinating moving parts — wind up causing us stress, and we think about having a helping hand with us. This is where tools like Trello come in, and with that comes the creation of Trello cards.
We’ve talked about Trello before, but today we have come up with Trello and HubSpot integration.
Before directly jumping on to the integration, first, we must understand the basics of Trello.
What is Trello Card?
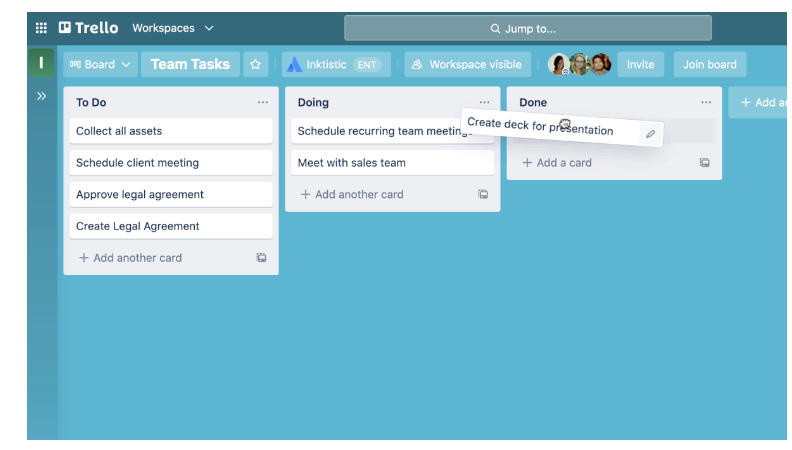
A card (C) is the smallest but most detailed unit of a board is a card (C). Cards are used to represent tasks and ideas. A card can be something that needs to get done, like a blog post to be written or something that needs to be remembered, like company vacation policies.
Cards can be customized to hold a wide variety of helpful information by clicking on the—drag and drop cards across lists to show progress. There’s no limit to the number of cards you can add to a board.

How to Use Trello Cards?
There are different ways how to use Trello cards.
- 1. To Add tasks and to-dos
As a fundamental unit of a board, cards are used to represent tasks and ideas. It can be used for something that needs to get done, like a customer support issue, a new design, a blog post, or something project-related that you need to be reminded of.
Cards can be customized to hold a wide variety of helpful information by clicking on them—drag and drop cards across lists to show progress. There’s no limit to the number of cards you can add to a board.
- Add cards for each task that needs to be completed by clicking “Add A Card” in the first list. Keep card titles short of making it easier to scan and see the status of each card on the board.
- 2. Get Specific On The Card Back
As mentioned earlier, you can click on a card to expand it and add and access more details. This is the “card back”, where you can get more specific with your information.
How to use Trello Cards with Hubspot Workflow (Trello Hubspot Integration)?
Before creating Trello cards with workflows, you’ll need to connect Trello to your HubSpot account. You can connect the app from the App Marketplace or within a workflow.
Step 1: Create Trello cards with a workflow:
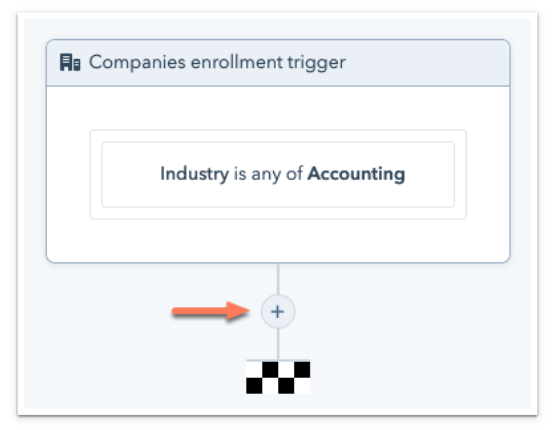
- In your HubSpot account, navigate to Automation > Workflows.
- Click the name of an existing workflow, or create a new workflow.
- Click the + plus icon to add a workflow action

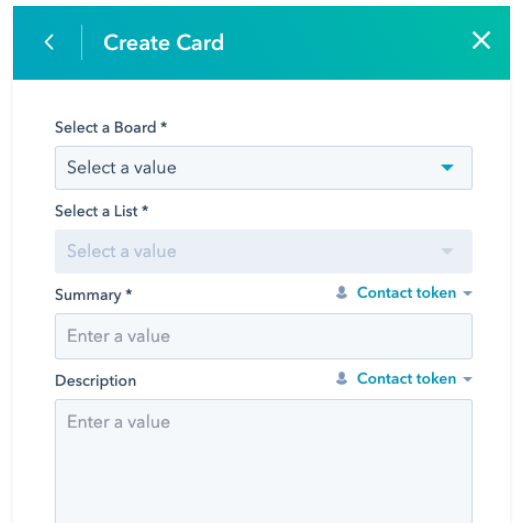
Step 2: Select Create Card

Step 3: Set up your card details
- Select a Board: select the board to which you want to add the card.
- Select a List: select the list to which you want to add the card.
- Summary: enter an outline for the card. To add record-specific details to the Trello card, use the Token dropdown menu to insert personalization tokens.
- Description: enter a report for the card if needed. To add record-specific details to the Trello card, use the Token dropdown menu to insert personalization tokens.
- Click Save.

Once records start going through the action, you can view the cards in Trello. If you’re not seeing cards being created in Trello, check the workflow history to consider any possible errors.
PRO TIP
Easily add cards to a board in bulk from a list or spreadsheet by copying the list and pasting it into a new Trello card. Trello will automatically turn each line-separated item into a new card, and you can kiss those old tools goodbye.
Conclusion
Trello is a simple and easy-to-use project management tool that has been helping many teams and individuals in their success journey, and Trello cards are a significant part of that journey. By following the above simple steps, you can keep everyone in your team on the same page that too with all of the information in one place. Isn’t that incredible!!!
Know More: What is HubSpot: How Hubspot is Building Pathways for Businesses to Succeed


