Although free, Gmail continues to be an excellent communications tool for small businesses. Many of Gmail’s options are hidden from plain sight, resulting in features such as email lists, group contacts and mass emailing to go unused. Here is How to Create a Mailing List in Gmail in 12 Simple Steps.
As a business, you have the power to create various groups according to your criteria and broadcast emails without turning it into a repetitive task. This type of feature is generally associated with a premium service, but it is available in Gmail for free.
Business use includes internal memos for individual recipients, team-specific emails, and external send outs to clients and partners.
The limitations with Gmail are sufficient to cover the needs of a small and even medium-sized business. Recipient caps per message go upwards to 500 addresses, while message size follows Gmail’s standard limit of 25MB. For email heavy environments, Gmail has a daily cap of 150 emails.
Even better, it’s easy once you know how to create a mailing list in Gmail. In this guide we’ll be following the newest version, but there is also an option to revert to the older format.
Why Would You Create a Mailing List in Gmail?
There are many reasons you may want to create a mailing list in Gmail. Here are a few of the most popular.
- It improves productivity. If you have to send emails to a large number of recipients – and regularly – you don’t want to have to manually add each email every time, which would take precious time away from actually doing the real work. Having a mailing list solves that problem.
- By combining a mailing list and some form of mail merge (whether you do that with a tool like Google Sheets), you can run email marketing campaigns at scale. Can you imagine adding in 100’s of emails every time you send one? Believe us, it still does happen.
List of Steps on How to Create a Mailing List in Gmail
Step 1
- Go to https://contacts.google.com in a web browser. If you’re signed in to your Google account, this opens a page that displays your google contacts. If you’re not signed in, sign in now to view the page.
- If you’re logged into the wrong account, click your profile icon in the upper-right side of the page and then either select the proper google account (if it’s signed in) or click Add account and enter your email address and password when prompted.

Step 2
Select the google contacts you want to add to your list. To select a contact, hover your mouse cursor over the person’s name, and then click the empty box to the left of their name. Do this for everyone you want to include in the list.

Step 3
Click the Labels icon It’s the icon that looks label or gift tab at the top of your google contacts list. This expands the Manage Labels window.

Step 4
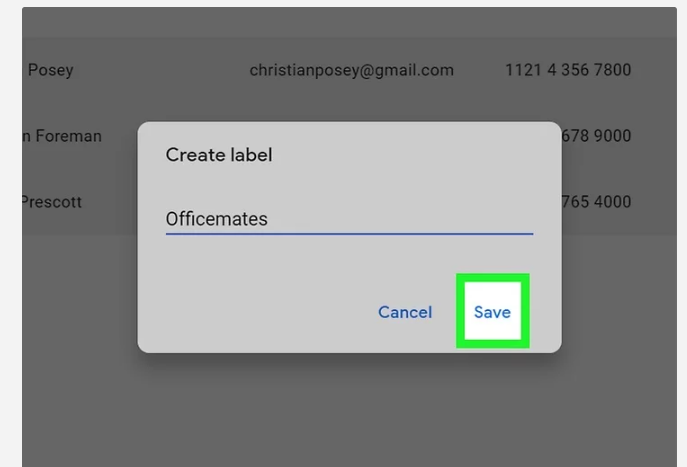
Click + Create label. It’s at the bottom of the pop-up window.

Step 5
Type a name for your mailing list. The name you enter here is how your mailing list will be represented in your google contacts. This is the name that you’ll type into the “To” field later when addressing an email to your list.

Step 6
Click Save to save your new mailing list. It’s at the bottom of the pop-up window.
Step 7
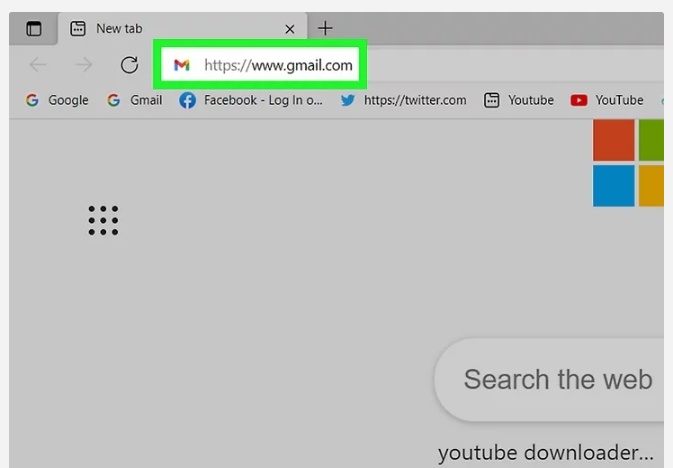
Go to https://www.gmail.com in your web browser. Now that you have a mailing list, you can easily create a new message in Gmail.
Step 8
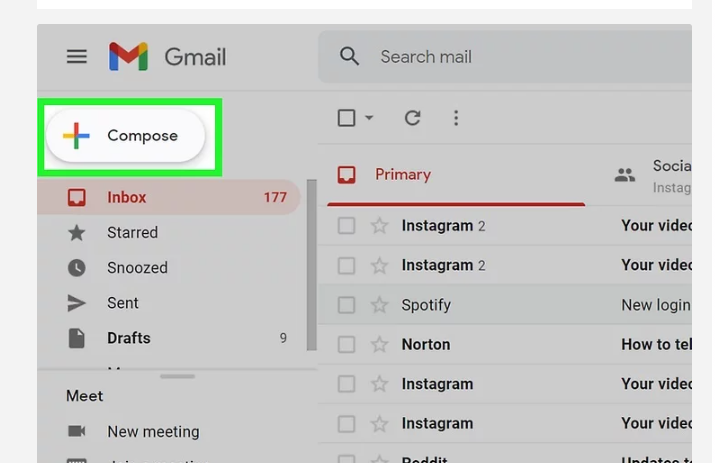
Click + COMPOSE. It’s at the top-left corner of your Gmail inbox.
Step 9
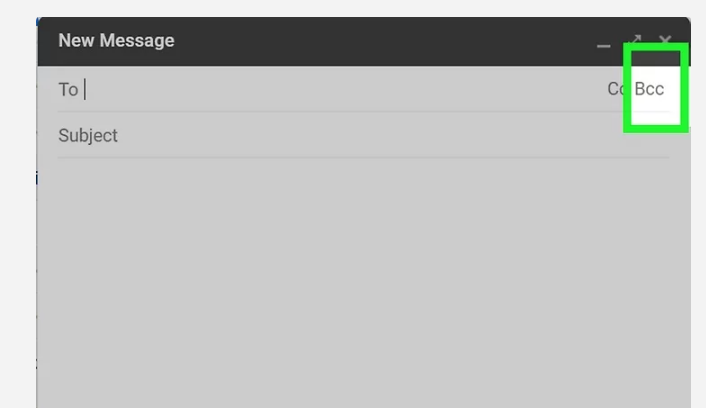
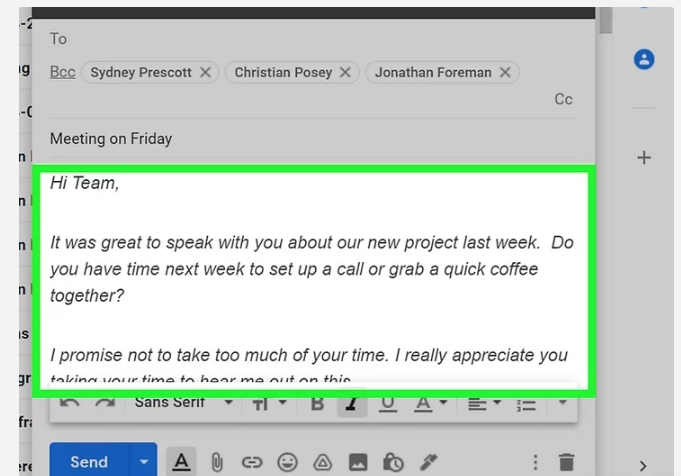
Click BCC. You’ll see this in the upper-right corner of the new message. This expands the BCC field below the “To” field at the top of the message.
- As long as you add the name of your mailing list to the BCC field instead of the To or CC field, the people on your mailing list won’t see the email addresses of the other people on the list. This protects the privacy of your mailing list members and is good mailing list etiquette.
- Technically, you can add this label to the To: field instead. But if you do that, everyone on the list will be able to see and reply to all other members. Don’t do this unless everyone on the list specifically asked to join a discussion list—when people reply, it could create way too many emails for list members, and there’d be no way for them to unsubscribe.
Step 10
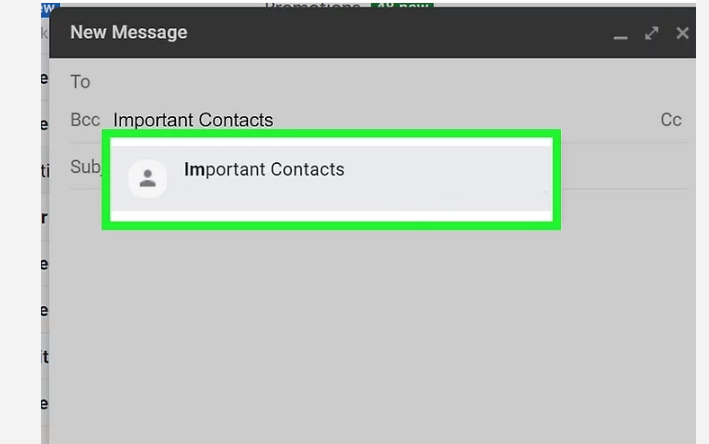
Type the mailing list label name into the “BCC” field. There are two ways to do this:
- The simplest way is to start typing the name of your mailing list into the “BCC” field. When the mailing list label appears as a suggestion, click its name to quickly add the mailing list members to the “BCC” field.
- If you have trouble finding your mailing list label this way, click BCC in the upper-left corner of the window (below the “To” field) to expand your list of contacts. Select the mailing list label from the drop-down menu at the top-right corner, check the “Select All” box, and then click INSERT at the bottom-right.
Step 11
Write your email. Now you can enter a subject for your email into the “Subject” field, and type the contents of your message into the larger typing area below that.
Step 12
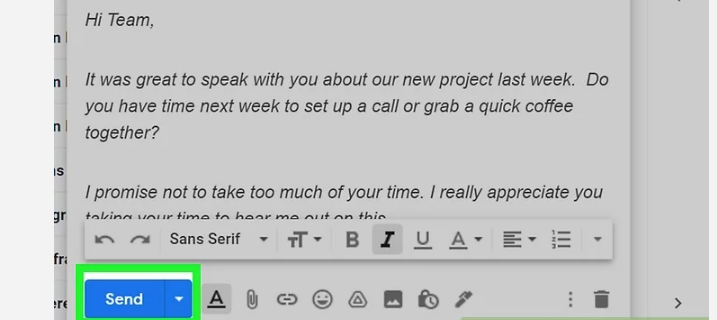
Click Send. It’s a blue button in the bottom-left corner of the “New Message” window. This sends your email message to everyone on the mailing list.
Conclusion
Mailing lists helps business in many ways and now that you know how to create a mailing list in Gmail, the process is simple enough to repeat, allowing you to create separate groups for all your needs.
Also Read: How to logout of Gmail account?